3D printing from SketchUp just got a little easier

Friday, April 30, 2010

i.materialise is a web-based 3D printing service provider. You give them a computer model and some money, and they send you a physical model in return. Pretty simple, really.

Except that 3D printing is usually anything but simple. Printing SketchUp models involves file conversion, scale conversion and quite a bit of checking for mysterious things like "watertightness". With demand for rapid prototyping on the rise, companies like Materialise (and a few others) are doing their best to make the SketchUp-to-object printing process easier than ever.

How it works

The new SketchUp plugin from i.materialise is essentially a wizard: After installing it, you open a model, launch the plugin and go through the steps. You scale your model to make it fit on the printing "plate", indicate areas of glazing (transparency), and even add ready-made elements (like trees) from a collection of "guaranteed-to-print" objects supplied by i.materialise. When you're ready, the plugin lets you one-click-upload your prepared model for printing.

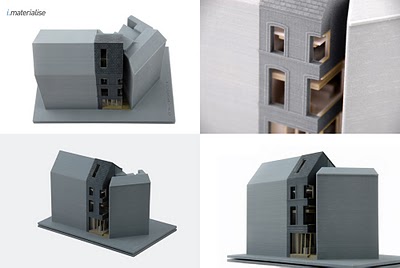
A model printed from a SketchUp file using the i.materialise plugin

Here are some more facts:

  • The i.materialise SketchUp plugin is free to download and use
  • Printed models can be either monochrome or full-color; fixed prices start around €300/$350
  • Models can be as big as 150 mm by 230 mm by 140 mm high (about 6 x 9 x 5.5 inches high)
  • For now, the i.materialise SketchUp plugin is Windows-only
  • There’s a terrific PDF Manual that you can download -- it answered all my questions

Enter the Design Challenge

To kick things off, the folks at i.materialise have even sponsored a little competition. The World of Houses SketchUp Design Challenge invites anyone to submit a SketchUp model for consideration. A jury (of which I am a part) will pick their three favorite models; the winners will receive a printed model as a prize. Take a look at the challenge website for all the details, but do it soon -- the deadline for submissions is May 24, 2010.

Posted by Aidan Chopra, SketchUp Evangelist

SketchUp training for kitchen & bath designers

Thursday, April 29, 2010

If you’re a kitchen & bath designer who’s interested in learning more about using SketchUp in your workflow, this one’s for you. Our SketchUp Authorized Training Center friends at School are planning a Designer Bootcamp for late May. You’ll learn how to use SketchUp Pro, LayOut and the 3D Warehouse to make your process easier, more efficient and more fun.

WHEN: May 26, 27 and 28
, 2010
WHERE: Orlando, Florida, USA
HOW MUCH: $699 for the 3-day event (18 hours of hands-on training)

For more information, check out School’s blog post about the event.

Up close and personal

We’re happy to announce that Nashville, Indianapolis, Charlotte, and Dallas are the newest additions to the family of Google Earth cities with high-quality 3D imagery. Exploring some of America’s most well-known cities from the comfort of your own computer just got even easier, and it also got more fun!

Whether exploring Nashville’s music venues along 2nd and Broadway, Indy’s Monument Circle in the heart of downtown, Charlotte’s diverse and numerous museums, or Dallas’s architecturally rich historic districts, the updated high quality 3D imagery will make you feel like you’re really there.

Give it a go in Google Earth or watch the video below for an up close tour!


Last call to cast your vote!

April is coming to a close, and you can still add your vote (if you haven’t already done so) for the best town in the Google Model Your Town Competition. On May 1, 2010 at midnight PST the voting page will be closed. We'll announce the winner on May 14th. The winner will be one of the following five finalists:
  • Barranco (Lima, Peru)
  • Braunschweig (Niedersachsen, Germany)
  • Donostia - San Sebastián (Gipuzkoa, Spain)
  • Dursley (Gloucestershire, United Kingdom)
  • West Palm Beach (Florida, United States)
Voice your opinion. Vote now!

Case Study: McCarthy Building Company

Wednesday, April 28, 2010

McCarthy Building Companies uses SketchUp Pro to streamline and enhance current processes which increase collaboration, improve quality, and reduce cost. Below is an excerpt of a case study we received from McCarthy. Visit our website to read the complete case study (and see more models).

McCarthy serves its clients with the latest technologies to solve their toughest construction challenges. We're true builders who utilize technology to augment our hands-on experience. That combination ensures clients get greater control—from preconstruction to completion. On-time scheduling, higher quality, safer projects, and better costs are just a few of the ways customers benefit from this unique approach. McCarthy also has a nationwide network of builder specialists, yet we maintain permanent offices in local markets too. That means we deliver expert solutions leveraging national best practices, plus strong sub-contractor relationships locally to help lower client cost and drive better results. It also means we have adeeply-felt obligation to give back to the community in every city we work in from coast to coast.

Challenge
Buildings and jobsites are becoming more and more congested and difficult to envision from just a set of 2D drawings. Designers and Engineers are creating structures in a 3D environment for placement in a 3D world. Building systems are rapidly evolving to implement new technologies that have not yet been implemented into construction before; resulting in challenging interfaces. It is no longer acceptable to go into a meeting with an owner with a hand-drawn site logistics plan. As a result of these challenges, McCarthy has instituted the use of Google SketchUp as a virtual construction tool to adapt and overcome to the challenges of the ever-evolving construction environment of the 21st century.

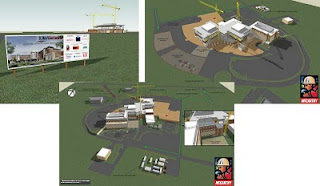
While working in conjunction with BSA LifeStructures this model, presented through LayOut,
was used to communicate the site logistics during construction.


Solution

McCarthy is committed to continuous innovative improvements to our building process. Utilizing SketchUp, our teams have been able to convey critical information in all phases from pre-construction to close-out, enhancing our Virtual Design and Construction services.

Site logistics - We have found that by creating a site logistics plan utilizing SketchUp, we can now show owners where we will be, and how it will impact their employees and clients.

RFIs and Virtual Mock-Ups - Our field staff is now finding solutions virtually, using SketchUp for RFI’s, mock-ups, self-perform concrete, and other details.


Virtual Construction Visualization - SketchUp has also been used to create concrete lift drawings to help the trades visualize the task from start to finish – potentially catching any accidental omissions before starting actual construction.

Results
By modeling our RFI’s, site logistics plans, building mock-ups, self-perform concrete, and many other details, we have found increased efficiency, better quality, and reduced costs. The aforementioned products have allowed us to improve our relationships with Owners, Architects and Subcontractors creating a collaborative environment that is beneficial to all parties.

As a leader in BIM technology, our vision is clear and we have been able to reduce cost by utilizing SketchUp to pass those savings onto our owners. One of the reasons Google SketchUp is such a powerful tool at McCarthy is the small learning curve and low cost. Most of the BIM systems out there have a larger learning curve and higher price. SketchUp’s ease of use and the availability of extensive online training, has allowed our teams to remain on-site and implement their new tools faster. SketchUp has allowed our quality department to standardize and visualize our best practices for our Building Enclosure Program, allowing these models to be used as a baseline for future projects. McCarthy holds an annual SketchUp contest throughout the company to enhance SketchUp’s use. Google SketchUp is now being utilized in almost every department from owner presentations to RFI’s. SketchUp has allowed us to continue to have the hands-on approach we need to be the best builder in America.

New Earth view highlights 3D buildings

Tuesday, April 27, 2010

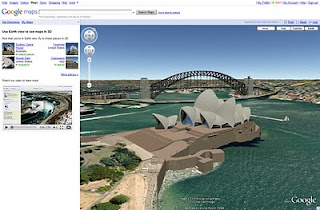
Earlier this week Google announced the new Earth view in Google Maps. Earth view uses the Google Earth plugin to show 3D buildings, imagery, and terrain in the browser on Google Maps.

The Google Boulder office (where Google SketchUp and Google Building Maker are developed) is particularly excited how 3D buildings modeled by the Google SketchUp community are used to demonstrate the new Earth view feature.

By clicking on the “Use Earth view” link in Google Maps, you can see a tour of 36 famous places and landmarks around the world -- 24 of those are 3D buildings created with Google SketchUp.

You can see who created the models by clicking on the author link next to the thumbnail image. This will open a new browser window that displays all of the 3D models created by that author.


Congratulations to all the geo-modelers whose 3D models were featured in the launch!

Announcing the Sketch-a-Space design competition

We've collaborated with our friends at Easter Seals on a unique design competition that launched yesterday: Sketch-a-Space invites both pros and amateurs to use Google SketchUp to design spaces for people with autism. Our own Project Spectrum was started specifically with this community of people in mind.

Qualities of light, color, pattern, sound and other factors are critical to all good design; when it comes to design for people on the autism spectrum, this is doubly true. Some folks who are on the autism spectrum have environmental sensitivities that can have a profound effect on their ability to make use of a space. Understanding these sensitivities and creating spaces that accommodate them is what Sketch-a-Space is all about.

The design competition is open to people in the United States; you can enter in any one of four categories:

  • Youth with Autism: individuals with autism age 13-17
  • Adult with Autism: individuals with autism age 18 and over
  • Youth: individuals without autism age 13-17
  • Adult: individuals without autism age 18 and over

For complete details, including information about entering the competition, prizes, deadlines, judging (hint: I'm one of them) and official rules, visit the Sketch-a-Space website.

Good luck!

Posted by Aidan Chopra, SketchUp Evangelist

More sharing options in the 3D Warehouse

Monday, April 26, 2010

When we recently added some sharing options to the Google 3D Warehouse there was one we were itching to add (the support wasn’t yet public so we couldn’t): Google Buzz. Two weeks later, the Buzz team did its job (you may have seen their recent blog post) and we're pleased to support sharing with Google Buzz on the 3D Warehouse. As an added bonus, we also added support for MySpace (found under the “Share” dropdown).

Here's a tip for those of you who like to share our "swivel view" of your 3D model: If you add Google Reader as a connected site to Google Buzz, you get swivel view in Buzz. Open Google Buzz and look for the “connected sites” link:


Click the link and make sure Google Reader is added. Then, share a model you find in the 3D Warehouse with Reader (it’s the 2nd icon in the list). You’ll see your Reader share now appears in Buzz - complete with swivel!


Earth view comes to Google Maps

Five years ago, shortly after Google’s acquisition of Keyhole, we introduced the first integration of Keyhole technology into Google Maps -- Satellite view. Suddenly, you could see what places actually looked like from the air, and easily switch between this view and the map view. Mapping has never been the same. A few months later, the desktop Google Earth application was released, and now we have over 600 million downloads. Today we are proud to announce the next major step in the marriage between Google Earth and Google Maps -- Earth view.


Those of you who aren’t as familiar with Google Earth might be wondering how Earth view differs from the satellite view that’s currently available in Maps. First of all, Earth view offers a true three-dimensional perspective, which lets you experience mountains in full detail, 3D buildings, and first-person dives beneath the ocean. The motion is fluid, and you can see the world from any viewpoint. Because Earth view is built right into Maps, you can switch back to cartographic view simply by clicking on the “Map” button. The view will even adjust automatically to a top-down, north-heading perspective as you transition. In essence, you now have all the best mapping tools at your fingertips, all in one place.

New to 3D? We’ve collected some cool places around the world for you to explore with a single click. Ever been to the Taj Mahal? How about the Sydney Opera house, or South Africa’s Table Mountain? You can even dive under the ocean and check out the wreckage of the Titanic. Just click one of the icons in the left panel and you’ll be flown from space down to your chosen location, which you can explore further by clicking and dragging the map or by using the navigation controls in the top of the view. We have 36 places set aside for you to explore, and you can cycle through them by clicking the "More places" link. We've also included a short video introduction to Earth view.


Earth view uses the same technology that powers the Google Earth desktop application. It allows you to view the same high-resolution imagery, terrain, and 3D cityscapes, all from right within your browser. We built the new Earth view on the Google Earth API and browser plugin, which make it easy for web developers to include Google Earth in their own websites. If you’ve already installed Google Earth, you can start using Earth view right away. Otherwise, with one click you can download and install the browser plugin and you’ll be ready to start exploring in 3D. The Earth plugin is currently supported on most Windows and Mac web browsers.

Get started today by going to maps.google.com/earthview, and explore your world in 3D.

Bend it like Fullmer: All about Shape Bender

Sunday, April 25, 2010

Ever wish that you could warp and bend stuff more easily in SketchUp? You can -- with the right plug-in. Ruby scripts for deforming your geometry abound; I wrote about FredoScale just recently. This time, I thought I'd mention Shape Bender by Chris Fullmer. You'll wonder how you got along without it.

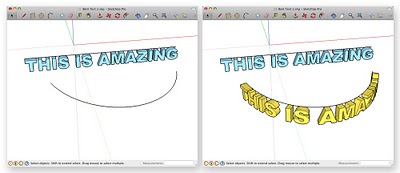
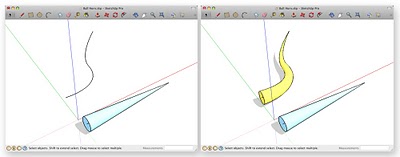
What Shape Bender does is actually pretty straightforward: It takes any 3D object in your model and bends/stretches it along a pre-drawn path that you select. Simple, but unbelievably powerful. Take a look at the following examples.

The straight, blue text is what I started with. The bent, yellow text is the result of my Shape Bender operation.

The bending path (above left) is a 3D spiral.

The possibilities are endless.

Shape Bender should be called Mind Bender. For a longtime SketchUpper like me, it's like my birthday and Christmas all rolled into one. But enough giddiness; here are the facts:

  • Visit the Shape Bender thread at SketchUcation to learn about and download the script for free
  • SB works on PCs and Macs, just like most SketchUp Ruby scripts
  • SB is currently available with English and French UI (user interface)
  • After you download the script, put both the Ruby file (it ends in “.rb”) and the folder in your SketchUp 7 Plugins folder

Here's my best attempt at a basic, getting-started set of Shape Bender instructions:

  1. Make sure the thing you want to bend is either a group or a component.
  2. Rotate it (if necessary) so it's lined up lengthwise along the red axis.
  3. Use the Line tool to draw a straight edge parallel to the length of the thing you want to bend. Make sure it's parallel to the red axis.
  4. Draw a curved edge that represents the bending path (that's my term, not Chris') for your forthcoming bent shape.
  5. Select the group or component to be bent.
  6. Choose Plugins > Chris Fullmer Tools > Shape Bender to activate the tool.
  7. Click once on the straight edge you drew in Step 3 (make sure it's highlighted before you click on it).
  8. Click once on the curve you created in Step 4.
  9. Wait for SketchUp to think. Depending on how zippy your computer is, maybe get some coffee.
  10. Take a look at the green preview to see what you're about to get. If it looks backwards, press the Up Arrow key on your keyboard to reverse the direction of the bending path. You can also press the Down Arrow key to reverse the direction of the straight edge you created in Step 3.
  11. When the preview looks the way you want it to, press Enter to finish the transformation.
Chris' video (below) does a great job of explaining the process:


Having spent some time with Shape Bender, here are some things I think it's helpful to know:

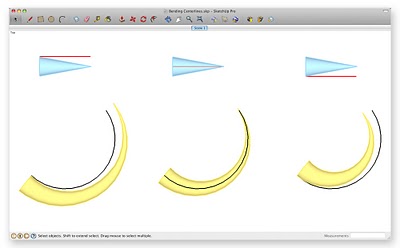
Location matters. Pay attention to the location of the straight, red axis-aligned edge you draw relative to the thing you're planning to bend. It basically acts as the "axis of bendation" (again, not Chris' term) for the operation. If you want your bent object's center line to follow the bending path precisely, draw the straight edge right through the center of the original object. Take a look at the following images to see what I'm talking about:

Note the different position of the red line relative to the original blue cone in each of the above three examples. Where you position the straight line has an effect on the result of your bending operation.

The length of your straight line matters. I’m referring to the one you drew in Step 3, above. Its length affects how the thing you’re trying to bend stretches (or squishes) when you bend it. If you want it to stretch, make your straight line shorter than your curved one. If you want it to squish, reverse that. To keep things from stretching or squishing, make both lines about the same length.

Beginnings and endings matter. Draw your curved bending path so its beginning and end points are at different places along the red axis. Otherwise, Shape Bender gets confused and freaks out.

Weld your bending path. The edge you designate as a bending path needs to be continuous; it can't be made up of more than one segment. To glue multiple segments together, use the Weld script. It's available for free at Smustard.com.

Congratulations on a great script, Chris. The SketchUp world owes you one.

Posted by Aidan Chopra, Product Evangelist

Discussions in the 3D Warehouse

Friday, April 23, 2010

Many of you are aware that there is a Google Group for geo-modeling enthusiasts. In the Group, folks help each other learn how to model for Google Earth, share tips and tricks, and get questions answered from the Google team.

We're enthusiastic about these discussions and happy to announce that we’ve improved the connection to the Google 3D Warehouse. Now, if you visit the 3D Warehouse in English you'll see links that previously took you to Google Groups will now go to a new page: http://sketchup.google.com/3dwarehouse/forum (you can also find this link labeled “Forum” at the bottom of every page).

If you’ve visited our group previously, don’t worry, everything is still there - you're still signed up, the discussions are still there, and you will continue to receive email notifications if you had those set up. What we’ve added is a new, fast, and inviting way to browse and participate in the modeling community.

Some of you may have seen this in the Map Your World Community site we announced a few months ago. Same discussions, different home.

We’d like to know what you think! We’re working hard to add features to the discussion interface, and invite you to give us feedback. I’ve started a topic where you should feel free to participate.

St Louis is now available in Building Maker

Wednesday, April 21, 2010

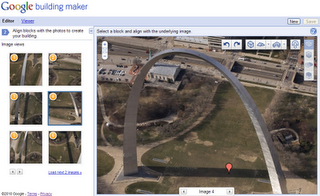
Today, we’re pleased to announce the “Gateway to the West”, Saint Louis, Missouri, is available for modeling in Google Building Maker. Building Maker is a fun, easy-to-use 3D modeling tool for adding 3D buildings to Google Earth. Choose St. Louis from the drop down menu and then pick your location to start modeling with photos that we provide.


Please keep in mind that even if a 3D model already exists in the the “3D Buildings” layer in Google Earth - the best model wins. To see the existing 3D models, click on the Earth button in top right corner. If you can improve on what’s already there, here’s your chance!

Mappers and Modelers converge on Google Zurich

Monday, April 19, 2010

What do you get when you put 90 Map Maker, Building Maker, and SketchUp users into one big room? A truly incredible experience and a lot of great ideas.

Summit attendees and staff at Google Zurich.

Last month some of our most talented Mappers and Geo-Modelers came together in Zurich to celebrate their work and talk about how to make mapping and modeling better. Attendees came from all over the world (Peru, Mongolia, Germany, Ukraine, Taiwan and Tanzania to name a few places) and had lots of opinions on how to improve our programs.

This summit was unique in that it was an unconference -- lots of smaller sessions proposed and run by the participants. We talked about everything from mapping historical data to user moderation in Google Earth (and you can read all about our discussions in the session notes). This format was amazing from a staff standpoint because we got to talk individually with a lot of different users. It was great from the attendees' perspective too, as they got to talk about the subjects that mattered most to them.

In addition to all the brainstorming, we had a lot of fun, too. Office tours, evening social events, and a fondue dinner overlooking all of Zurich made for a very entertaining (and filling!) few days. Check out this highlight video to get a feel for how things went:


Want to experience the conference for yourself? Check out our abundant photos and prolific session notes. Thanks to everyone who made this event such a success!

Posted by Vicky Tait, SketchUp Support Operative

Connecting SketchUp Scenes to LayOut model viewports

Friday, April 16, 2010

Here's a juicy little factoid that experienced SketchUp Pro users know: When you're working with multiple SketchUp model viewports in LayOut, it really helps to create corresponding scenes in your SketchUp model.

The primary reason for this is pretty simple. While it's easy to pan, zoom and orbit your model view around in LayOut until it's exactly right, there's no easy way to save that view in case you need to come back to it later. If there's a particular camera angle you want to use in your LayOut doc, it'll save you time in the long run to open the model in SketchUp and create a scene with the view you want.

Follow these steps to associate a scene you've created in SketchUp with a model viewport in an existing LayOut file:

  1. In LayOut, right-click on a model viewport and choose Open with SketchUp from the context menu.
  2. In SketchUp, use the navigation tools to frame the view you want.
  3. Add a new scene to your model (View > Animation > Add Scene).
  4. Save your model.
  5. In LayOut, right-click on the model viewport and choose Update Reference from the context menu.
  6. Make sure the model viewport is selected, then open the SketchUp Model dialog box (Window > SketchUp Model).
  7. In the "Scene" drop-down menu, choose the scene you created in Step 3.
LayOut's SketchUp Model dialog box lets you assign a specific SketchUp scene to a model viewport.

Voilà! Your scene is now associated with your model viewport.
Using section cuts in LayOut

There are a few situations when you MUST use SketchUp scenes in combination with LayOut viewports. One of these involves section cuts. Because you can't create, activate (or de-activate) section cuts directly in LayOut, you have to set up scenes to be able to make use of them*.

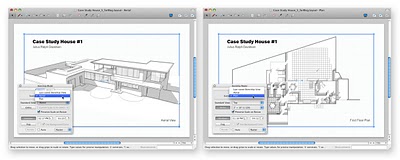
In this example, I've modeled J.R. Davidson’s Case Study House #1, and I want to create a two-page LayOut doc as a presentation file. The first page will show a bird's-eye perspective; the second page, a first-floor plan. I use a horizontal Section Plane to produce the plan view (see below).

I use a Section Plane (Tools > Section Plane) to create a cut plan view of this building.

Still in SketchUp, I save a scene for each of the two views I want to present in LayOut:

I create two scenes in my SketchUp model.

In LayOut, I create a two-page doc and insert the CSH#1 model on each page. Using the SketchUp Model dialog box, I assign one scene to each of the two viewports (one on each page).

I assign each of the scenes I created to different viewports in LayOut.

*It’s technically possible to show/hide section cuts in LayOut by making clever use of Styles, but even that has its limitations. Section cut visibility in Styles is either on or off; as soon as you add two section planes, you’re back to needing Scenes. For this reason, I prefer sticking to Scenes all the time -- it’s simpler and it works all of the time.

Posted by Aidan Chopra, SketchUp Evangelist

Corb says you should use SketchUp

Tuesday, April 13, 2010

Paul Lee (of Viewsion, a Google Authorized Training shop in Ireland), has made a couple of videos that made me laugh out loud. In the first one, Paul channels Le Corbusier and castigates architects for not using "ze SketchUp":


This next video features "Charles Edouard" reinforcing the importance of using lightweight geometry:


Congrats, Paul -- and keep 'em coming.

Posted by Aidan Chopra, SketchUp Evangelist

Dazzling new 3D buildings for New York City in Google Earth

Monday, April 12, 2010

(Cross-posted from the Google Lat Long Blog)

[From time to time we invite guests to blog about initiatives of interest, and are very pleased to have George Fertitta, Chief Executive Officer of NYC & Company join us here. – Ed.]

In January 2009, NYC & Company, the official marketing, tourism and partnership organization of New York City, launched nycgo.com and opened an information center that makes it easier for visitors and residents to explore all the vibrancy, excitement and diversity of New York City's five boroughs.

Mirroring the integrated Google Maps on the website, our highly interactive Official NYC Information Center in Midtown Manhattan includes Google Maps–based Interactive Map Tables where you can plan your visit and a beautiful Video Wall featuring 3D imagery of New York City in Google Earth that lets you “fly” through your selected itinerary. Since we opened our doors, thousands of tourists have virtually explored New York in our center before venturing out on their own.

When Google let us know that they would be releasing new, high-quality 3D imagery of New York City, we were excited to help spread the word. The new imagery will be an amazing improvement to our already-stunning Video Wall and will help us to reach our goals in making New York City more accessible to visitors and residents alike. The detail at the street level, as you’ll see in the video below, makes it easier than ever to virtually experience our variety of cultural institutions, storefronts and residential and commercial buildings.


We invite you to come by the Information Center to see for yourself, or to power up Google Earth and explore the Big Apple from your desktop or phone.

Adding custom attributes to your reports

Friday, April 9, 2010

In a blog post I wrote awhile back, I talked about using SketchUp Pro to generate tabular reports -- lists, basically -- from the groups and components in your models. I created a simple picket fence, then generated a report that helped me figure out how much lumber I'd need to build it.

In the picket fence example, I used attributes (Length, Width, etc) that pre-exist for every group and component SketchUp creates. I didn't need to add any of my own attributes to do the calculations I wanted; the information I needed was included in the generated report automatically.

With SketchUp Pro, it's easy to add your own custom attributes to groups and components. Taking the fence example, I'd like to make it easier to do two things when I design a fence and generate a report:

  • estimate construction costs
  • estimate how much paint I'll need to paint the fence
Adding a custom Cost attribute

I'll use the Post component to illustrate what I'm doing. Each post is 5.5 feet long. 4x4 lumber (from which the posts will be cut) is available in 8, 10, 12 and 16 foot lengths; of these, buying 12 foot lengths will result in the least waste and therefore the lowest cost. Since a 12 foot 4x4 costs $16.97 and yields 2 posts, the cost of a single post is $8.48.

To add a custom Cost attribute to my Post component, I do the following:

  1. Select an instance of the Post component in the model.
  2. Right-click on the component and choose Dynamic Components > Component Attributes from the context menu.
  3. Click Add attribute in the Component Attributes dialog box and type Cost, then hit Enter.
  4. In the blank field (box) next to the word "Cost", type =8.48 and hit Enter.
Use the Component Attributes dialog box in SketchUp Pro to add a custom attribute to a component.

Now my Post component includes a custom attribute called Cost whose value is 8.48. This value is fixed; it isn’t based on a formula that includes other values. Adding a formula here is entirely possible, though. If Cost could be calculated based on another attribute (like LenZ, perhaps), it would make sense to enter a formula that does just that. If lumber were $1.43 per linear foot, the formula might look like this: =LenZ*1.43

Adding a custom Area attribute to estimate paint quantity

In order to be able to estimate how much paint I'll need to cover my fence, I need to calculate its surface area. Luckily, the Component Attributes dialog box includes a handy function that makes this relatively easy: FACEAREA returns (calculates) the total surface area (in square inches) of a given material in any component. If you don't specify a material, FACEAREA returns the total surface area of every face in your component -- both sides of every face, actually. To get the surface area of just the outside (where you're most likely to paint), all you have to do is divide by 2. To convert square inches to square feet, divide by 144.

To add a custom Area attribute, here's what I do:

1. Select an instance of the Post component in the model.
2. Right-click on the component and choose Dynamic Components > Component Attributes from the context menu.
3. Click Add attribute in the Component Attributes dialog box and type Area, then hit Enter.
4. In the blank field (box) next to the word "Area", type =(FACEAREA()/2)/144 and hit Enter.

Calculate surface area by using the FACEAREA function. Divide by 2 to get just the outside area; divide by 144 to convert from square inches to square feet.

Of course, the area shown by my new Area attribute is bigger than the area I actually plan to paint; it includes the part of the post that's buried underground. If I'd wanted to be more precise, I could have included something in my formula that accounted for this. I'd rather buy more paint than I need, so I'll leave it as-is.

Using custom attributes in reports

Any custom attributes you add to a group or component automatically appear in your reports. After adding the Cost and Area attributes to my Post component, generating a report (File > Generate Report...), and deleting the attribute columns I don’t need, here’s what I end up with:

Custom attributes you add to your components automatically appear in your generated reports.

It bears mentioning that adding custom attributes to your components before you start modeling with them makes things easier. If you add a formula-based custom attribute to a single instance of a component, you might need to redraw (Right-click > Dynamic Components > Redraw) each additional instance separately to get it to update.

Posted by Aidan Chopra, SketchUp Evangelist
The 3D Warehouse goes social

Tuesday, April 6, 2010

Are you proud of your work? Now you can share it with your friends, followers, family or anyone in your social network.

Today we introduced a new feature in the Google 3D Warehouse that allows you to quickly and easily share 3D models using popular social networking applications including Facebook, Twitter, Digg, Delicious and of course our very own Google Reader.

The ability to share news stories, videos and other Internet content has been around for a while (we use it ourselves on YouTube), so we thought our avid modeling community might enjoy sharing 3D models. You’ll find the new Share feature in the top-right corner on the model details page (like this one).

In most cases we simply incorporate the model name and a link to the Google 3D Warehouse into the respective social application, like Twitter for example:


With Google Reader however we went a step further by including swivel-views:

We’ll be enhancing this feature in the very near future, but we wanted to let you start sharing as soon as possible.

Model Your Town finalists announced: Cast your vote!

Thursday, April 1, 2010

OK folks -- it’s time to vote for your favorite 3D town. The submission phase of the Google Model Your Town Competition is over and the five finalists have been selected. Without further ado, they are (in alphabetical order):

Barranco, Lima, Peru
Modeler: Jorge De Albertis
Barranco’s collection of models

Braunschweig, Niedersachsen, Germany
Modeler: Leonhard Pröttel
Braunschweig’s collection of models

Donostia - San Sebastián, Gipuzkoa, Spain
Modelers: Pedro Domecq Aguirre, Eneka Mujica, Gabriel Garcia, Jan Wesbuer, Fermin Saraseta
Donostia - San Sebastián’s collection of models

Dursley, Gloucestershire, United Kingdom
Modeler: John Wilkes
Dursley’s collection of models

West Palm Beach, Florida, United States
Modeler: Chris Sardinas
West Palm Beach’s collection of models

This overview video flies to each of the finalist towns:


On the voting page, you’ll find a separate one-minute video tour for each town, as well as a link to a KML file that you can use to see the models in Google Earth. Take a look at everything, decide which you think is best, then weigh in -- you have until May 1st, 2010 to cast your vote.

Congratulations to the finalists and to all of the teams who submitted entries. Choosing the top five certainly wasn’t an easy task. As you can see from this collection of the teams who entered, the competition was tough. Good luck!

Discovering the magic and wonder of FredoScale

SketchUp's Ruby API (Application Programming Interface) is one of the most powerful things about our software; it's enabled talented programmers to build Ruby scripts (plug-ins and extensions) that allow SketchUp to do some pretty amazing things. This world of add-ons is so big and fast-evolving that we generally don't do a terrific job of providing our blog readers with any insight into it. Here begins an attempt to do better.

FredoScale was developed by the venerable Fredo6, an all-star SketchUp Ruby developer responsible for some of the most impressive and useful plug-ins I've seen. Here are the basic facts:
  • FredoScale isn't really one tool; it's actually a whole set of tools that you can use to deform your geometry in a number of different ways.
  • Fredo6 makes his plug-ins available as donationware, meaning that they're free to download and use, but that payment is always gladly accepted.
  • Just like most other Ruby scripts, FredoScale works on both Macs and PCs.
  • IMPORTANT: Fredo6 has fixed a couple of issues that were causing problems for some SketchUp users. Take a look at his note for more information.

You'll see when you install it that FredoScale provides a wallop of functionality. Here's some of what it lets you do:

Better scaling

Ever noticed how SketchUp's native Scale tool always lines up it's scaling box with the model axes? That's fine some of the time, but it's not ideal when the thing you're trying to scale isn't perfectly aligned with those axes. See the first image in the figure below: I'd like to stretch the vase along its length. When I select it and choose the Scale tool, its scaling box (made up of 26 green grips) is misaligned because the vase is rotated relative to the axes -- I can't scale it in the direction I want.

SketchUp's Scale tool aligns itself with the modeling axes, making it difficult to scale this vase along its vertical axis.

Using FredoScale's Scaling tool, I can specify the orientation of the scaling box to make it line up the way I want; all I have to do is click on a face to tell it where to set up. After that, the scaling box works just like SketchUp's Scale tool. Super-handy.

FredoScale lets me define the orientation of the scaling box, making it much easier to do what I want to do.

Tapering and Stretching

Take a look at the following images; they say more than any words I could write:

The Tapering tool lets you (among other things) turn a sphere into an egg.

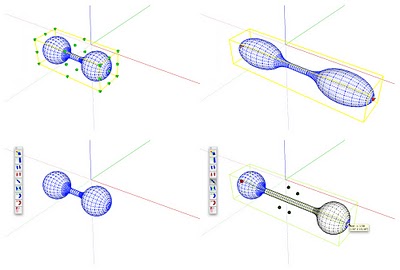
Using SketchUp's native Scale tool stretches the barbell by distorting it (top). FredoScale's Stretching tool somehow figures out what to stretch and what not to, resulting in a smarter stretching operation (bottom).

Twisting and Bending

These last two made my jaw drop. FredoScale's Twisting tool lets you corkscrew anything you select; look what it did to an extruded star I modeled (below).

The Twisting tool is amazing. Expect a bumper crop of corkscrew buildings in the next 5 years.

You can use the Bending tool to do something I've always had a miserable time doing in SketchUp. I wish I'd had it when I modeled Santa. A simple example: Select a cylinder, active the Bending tool, indicate an origin and axis of rotation (bendation?) and go nuts. You need to try it to see how ground-breaking it is.

The Bending tool lets you do things you just can't do with regular ol' SketchUp.

Convinced? You can download the latest version of FredoScale by visiting this thread at SketchUcation. The link to download is in the thread, as are links to PDF documentation in English and French. Here's a video Fredo6 made to explain FredoScale:


One more thing: I often struggle when trying to install Ruby scripts on my system; I never seem to get them in the right folders. In case you're like me, here's where to put everything you download and unzip -- inside your Plugins folder, you should have the following:

  • a folder called LIBFREDO6_Dir_34
  • a folder called FREDOSCALE_Dir_20
  • a file called LibFredo6.rb
  • a file called ZLoader__FredoScale.rb

For more information about Rubies (including how and where to install them), take a look at the Ruby scripts page on the SketchUp website.

Posted by Aidan Chopra, SketchUp Evangelist