An article about "Skipping the Architect"

Tuesday, June 26, 2012

An article published in last week's New York Times made me a little queasy. Entitled "Skipping the Architect: Wise or Otherwise?", it profiles a handful of people who, empowered by user-friendly drawing apps like SketchUp, have decided to do their own design work. An excerpt:
Philippe Jeanty was interested in saving money but also time when he decided to design a house using SketchUp. Mr. Jeanty, a 58-year-old doctor with no architecture or engineering training, spent several months coming up with a plan for a one-story, three-bedroom house in Fairview, Tenn., with thick, insulated walls and numerous windows. Using SketchUp, he was able to keep tweaking the design until he was satisfied. “If we had to discuss the plans with an architect and said, ‘We want to change this, change that,’ it would be an endless number of meetings,” Mr. Jeanty said.
As it was, he just hired a draftsman and a builder to carry out his plan, and his lack of design knowledge, he said, wasn’t an issue: “The only thing we really regret is putting marble in too many places. It’s a pain to maintain.”

Here at SketchUp HQ, we're more than a little conflicted about stories like this one. On one hand, it's great that folks like Dr. Jeanty are able to realize their ideas using our software—I'd love to congratulate him on his successful project. On the other hand, owning a scalpel doesn't make me a surgeon. I would no sooner remove my own gall bladder than proceed with a major building project without consulting an expert.

SketchUp is used by everyone from schoolchildren to world-renowned architects, and that's exactly how we like it. But how should we react to stories that portray accessible tools as a replacement for domain expertise? How do we continue to encourage enthusiastic amateurs without downplaying the importance of trained professionals?

The original NYT article didn't include a feedback thread, which is a shame. If you like, feel free to use this post's Comments to let us know what you think.

Wanted: SketchUp eye candy for our walls

Monday, June 11, 2012

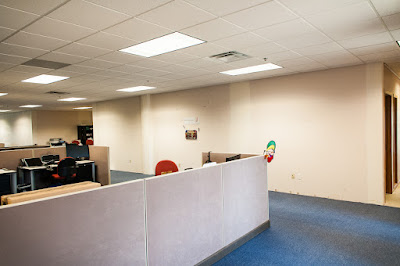
It’s been a week since we moved into our new office, and the walls don’t seem to be decorating themselves:

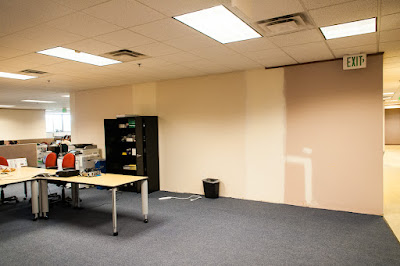
Our Welcome Area is currently less than welcoming.
Nancy shows off her bowling trophy. Note the bare walls in the background.
This wall looks like something Mark Rothko threw up.
Minimalism is for weenies. Long live ornamentation!
Here’s what we’d like you to do: Send us your best-looking SketchUp images so that we can print them out and hang them up. As we get to work on the future of our beloved product, we want to be positively swimming in visual inspiration. Drowning in it. When visitors come to the SketchUp Mothership, we want their eyes to pop out, dance the Charleston, sing Hallelujah and burst into flames. Inundate us with your imagery.

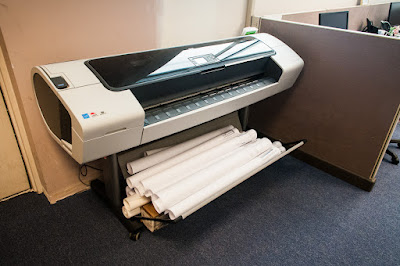
Stylistically, anything goes: raw SketchUp, photo-renderings, LayOut files, pictures of 3D printed stuff—we want it all. And we’re planning to print BIG, too. The last thing we grabbed as we headed out the door was a mammoth HP plotter; it prints 36 inches (about a meter) wide.


This plotter yearns for your SketchUp deliciousness. Note: In a grand stroke of irony, someone (who shall remain nameless) has accidentally plotted out the instructions for setting up a networked printer.
Please email your images to us at sketchupblog@gmail.com. Make sure that the images you send are of sufficient size: about 3000px should do nicely, packaged as JPEGs. Lastly, please include the phrase “SketchUp Wall Candy” in the subject of your email. After we’ve had time to decorate, I’ll take some pictures and blog again. Help us un-ugly our temporary space!

On another note, something momentous occurred today. Scott (our old boss, and now the Boulder Site Director at Google) brought us a housewarming present: a beautiful, new espresso machine. I think I'll top off my first doppio with a doppio; productivity is about to soar. 

John (left) is crazed with relief as the new espresso machine is unwrapped. Tom (right) finds a better home for our previous caffeination solution. We have Scott (on behalf of our old friends at Google) to thank for our soon-to-be soaring productivity.
Posted by Aidan Chopra, SketchUp Evangelist

Protect all images in your Blog jquery trick

Saturday, June 9, 2012

Here is a most important trick every blogger need. This trick is about how to protect all your images in your blog with a transparent image covered on it. I recently posted an article about How to protect images? .This article about to protect all images.


Related Articles
How to protect images in your blog?
Do you want to see demo? Try to save picture in this blog.
----------------------------------------------------------
What's inside this article
 Step 1: Add jQuery plugin (if your blog have a jquery plugin,ignore this step)

  • Go to Template->Edit HTML [A dialog box appears click Proceed]
  • Copy and paste the below code <head> and save it
<script src='http://ajax.googleapis.com/ajax/libs/jquery/1.7.1/jquery.min.js' type='text/javascript'/>
  • Go to Blogger Account
  • Template->Edit HTML [Click Proceed]
  • Copy the code above </head>

Protect only First image in every Post

<script type='text/javascript'>
//<![CDATA[
$(function(){
$(".post-body img:nth-child(1)").after("<img src=\"http:\/\/2.bp.blogspot.com\/-lQW7QlMoz10\/T8yL_5IPF6I\/AAAAAAAAAQU\/5R8ngq17xzw\/s1600\/transparent.png\" alt=\"NetOopsblog protected image\" style=\"margin-left: -212px; opacity: 0; position: relative; top: 0;\" \/>");
});
//]]>
</script>

Protect all images in every post

<script type='text/javascript'>
//<![CDATA[
$(function(){
$(".post-body img").after("<img src=\"http:\/\/2.bp.blogspot.com\/-lQW7QlMoz10\/T8yL_5IPF6I\/AAAAAAAAAQU\/5R8ngq17xzw\/s1600\/transparent.png\" alt=\"NetOopsblog protected image\" style=\"margin-left: -212px; opacity: 0; position: relative; top: 0;\" \/>");
});
//]]>
</script>
I think you liked this article...please like and share..
 

How to Add Yahoo Smileys on Blogger Threaded Comments?

Friday, June 8, 2012

Yahoo smileys for Blogger Threaded Comments
I 'm going to say about how to add yahoo smileys to Blogger Threaded comments. This is an awesome trick was scripted by an Indonesian Blogger Kang Ismet and I think he did a very good job for us. This Blogger hack works with New Blogger Threaded commenting system.
Follow the instructions Below..


To see demo :
Go to Comments OR Click Here

What's inside this article?
How to Add yahoo smileys to Blogger Threaded comments in 3 steps..?
  • Go to Blogger Account
  • Go to Template -> Edit HTML [click Proceed]

Add CSS code

img.bhacksmly {
    height: auto !important;
    vertical-align: middle !important;
    width: auto !important;
    border:0px !important;
}

Add Javascript code

  • Find </body> and copy the below code just above it.
<script src='https://netoopscodes.googlecode.com/svn/branches/Js files/ysmiley threaded comments-min.js' type='text/javascript'/>
  •   Save the template
    Save Template

Add HTML code

  • Check Expand Widget Templates
  • Find <div class='post-footer-line post-footer-line-3'>
  • Find the next </b:includable> and copy the code above it
Example
 </div>
.
Place code here


</b:includable>

  • Copy the below code above </b:includable>
<b:if cond='data:blog.pageType == &quot;item&quot;'>
<div class='netoopsblogysmile' id='ysmile' style='
background: -moz-linear-gradient(top, #e4f5fc 0%, #bfe8f9 50%, #9fd8ef 51%, #2ab0ed 100%);background: -webkit-gradient(linear, left top, left bottom, color-stop(0%,#e4f5fc), color-stop(50%,#bfe8f9), color-stop(51%,#9fd8ef), color-stop(100%,#2ab0ed));background: -webkit-linear-gradient(top, #e4f5fc 0%,#bfe8f9 50%,#9fd8ef 51%,#2ab0ed 100%);background: -o-linear-gradient(top, #e4f5fc 0%,#bfe8f9 50%,#9fd8ef 51%,#2ab0ed 100%);background: -ms-linear-gradient(top, #e4f5fc 0%,#bfe8f9 50%,#9fd8ef 51%,#2ab0ed 100%);background: linear-gradient(top, #e4f5fc 0%,#bfe8f9 50%,#9fd8ef 51%,#2ab0ed 100%);border-radius: 3px;width:100%; padding:10px; height:65px;'>
<img alt='' class='bhacksmly' src='http://l.yimg.com/us.yimg.com/i/mesg/emoticons7/1.gif'/> :)
<img alt='' class='bhacksmly' src='http://l.yimg.com/us.yimg.com/i/mesg/emoticons7/2.gif'/> :(
<img alt='' class='bhacksmly' src='http://l.yimg.com/us.yimg.com/i/mesg/emoticons7/3.gif'/> ;)
<img alt='' class='bhacksmly' src='http://l.yimg.com/us.yimg.com/i/mesg/emoticons7/4.gif'/> :D
<img alt='' class='bhacksmly' src='http://l.yimg.com/us.yimg.com/i/mesg/emoticons7/7.gif'/> :-/
<img alt='' class='bhacksmly' src='http://l.yimg.com/us.yimg.com/i/mesg/emoticons7/8.gif'/> :x
<img alt='' class='bhacksmly' src='http://l.yimg.com/us.yimg.com/i/mesg/emoticons7/10.gif'/> :P
<img alt='' class='bhacksmly' src='http://l.yimg.com/us.yimg.com/i/mesg/emoticons7/11.gif'/> :-*
<img alt='' class='bhacksmly' src='http://l.yimg.com/us.yimg.com/i/mesg/emoticons7/12.gif'/> =((
<img alt='' class='bhacksmly' src='http://l.yimg.com/us.yimg.com/i/mesg/emoticons7/13.gif'/> :-O
<img alt='' class='bhacksmly' src='http://l.yimg.com/us.yimg.com/i/mesg/emoticons7/14.gif'/> X(
<img alt='' class='bhacksmly' src='http://l.yimg.com/us.yimg.com/i/mesg/emoticons7/15.gif'/> :7
<img alt='' class='bhacksmly' src='http://l.yimg.com/us.yimg.com/i/mesg/emoticons7/16.gif'/> B-)
<img alt='' class='bhacksmly' src='http://l.yimg.com/us.yimg.com/i/mesg/emoticons7/18.gif'/> #:-S
<img alt='' class='bhacksmly' src='http://l.yimg.com/us.yimg.com/i/mesg/emoticons7/20.gif'/> :((
<img alt='' class='bhacksmly' src='http://l.yimg.com/us.yimg.com/i/mesg/emoticons7/21.gif'/> :))
<img alt='' class='bhacksmly' src='http://l.yimg.com/us.yimg.com/i/mesg/emoticons7/24.gif'/> =))
<img alt='' class='bhacksmly' src='http://l.yimg.com/us.yimg.com/i/mesg/emoticons7/26.gif'/> :-B
<img alt='' class='bhacksmly' src='http://l.yimg.com/us.yimg.com/i/mesg/emoticons7/101.gif'/> :-c
<img alt='' class='bhacksmly' src='http://l.yimg.com/us.yimg.com/i/mesg/emoticons7/100.gif'/> :)]
<img alt='' class='bhacksmly' src='http://l.yimg.com/us.yimg.com/i/mesg/emoticons7/102.gif'/> ~X(
<img alt='' class='bhacksmly' src='http://l.yimg.com/us.yimg.com/i/mesg/emoticons7/103.gif'/> :-h
<img alt='' class='bhacksmly' src='http://l.yimg.com/us.yimg.com/i/mesg/emoticons7/28.gif'/> I-)
<img alt='' class='bhacksmly' src='http://l.yimg.com/us.yimg.com/i/mesg/emoticons7/41.gif'/> =D7
<img alt='' class='bhacksmly' src='http://l.yimg.com/us.yimg.com/i/mesg/emoticons7/43.gif'/> @-)
<img alt='' class='bhacksmly' src='http://l.yimg.com/us.yimg.com/i/mesg/emoticons7/45.gif'/> :-w
<img alt='' class='bhacksmly' src='http://l.yimg.com/us.yimg.com/i/mesg/emoticons7/47.gif'/> 7:P
<img alt='' class='bhacksmly' src='http://l.yimg.com/us.yimg.com/i/mesg/emoticons7/48.gif'/> 2):)
<img alt='' class='bhacksmly' src='http://l.yimg.com/us.yimg.com/i/mesg/emoticons7/110.gif'/> :!!
<img alt='' class='bhacksmly' src='http://l.yimg.com/us.yimg.com/i/mesg/emoticons7/111.gif'/> \m/
<img alt='' class='bhacksmly' src='http://l.yimg.com/us.yimg.com/i/mesg/emoticons7/112.gif'/> :-q
<img alt='' class='bhacksmly' src='http://l.yimg.com/us.yimg.com/i/mesg/emoticons7/113.gif'/> :-bd
<img alt='' class='bhacksmly' src='http://l.yimg.com/us.yimg.com/i/mesg/emoticons7/114.gif'/> ^#(^
</div><a href="http://netoopsblog.blogspot.com"></a></b:if>

  • Save the Template
  • That's all


We proudly introduced our new yahoo smileys to Blogger threaded comments...Please Check it and feel it...Click HERE
We will post like our Yahoo smileys soon...
If you liked this article please Join via Google Friend Connect,Share,Like us to get Stronger...

Moving onward, moving in

Thursday, June 7, 2012

Monday morning, Sandra and I (the token married couple on the team) drove right past the Google office on our way to work. It's a new day for SketchUp, and for the SketchUp crew. With “the deal” officially closed, all 30+ of us have moved to a building that will be SketchUp Worldwide HQ—for about three months, at least. They're building us a brand new office right here in Boulder, Colorado; until it's ready, we're in temporary digs.
John (our fearless product manager) and Susan (the scale figure in every new SketchUp model) are neighbors here in Temporary Cubeland.
Laura (and her million-dollar smile) helps customers from the Sales Quad.
We sent an expedition out to buy nerd toys for the office. Mission accomplished.
Our QA (Quality Assurance) lab includes Brad, who looks surprisingly lifelike for a robot.
The engineering team has been working out.
Our new office has lots of empty space. Floor hockey, anyone?
My Junk Fort (accumulated over eight years, three companies and four offices) keeps Tyson at a safe distance. Tyler and Jody gossip in the background.
Simone demonstrates why he's the new QA manager by crawling under his desk to plug something into the adjacent wall.
The Tent Room makes dedicated outdoorsmen like Mark feel right at home.
We have a couple of billion pairs of socks with the wrong logo on them.

Our new friends at Trimble have bent over backwards to make us feel welcome. Punching in on Monday, we all found shiny new computers on our desks. Last week I was using a three-year-old laptop with a broken USB port, a twenty minute battery and a Yucatan-sized dent. Now I'm rocking a 15" Macbook Pro with a half-terabyte solid state drive and 22-inch rims. I'm ashamed to admit it, but my new hardware makes me feel taller.

Igor, Andrew and Tyler spent last week in California working on the transfer of SketchUp's intellectual property from Mountain View (Google) to Sunnyvale (Trimble). Even in this era of Wi-Fi and bluetooth and NFC and Dropbox and general cloud worship, the best way to make sure SketchUp's bits and bytes moved safely from seller to buyer was to load the whole shebang onto a couple of monster hard drives and chauffeur them down the freeway.

Igor (tennis sweater) and Andrew (fauxhawk) with two members of Google's IT staff outside of Trimble HQ with armfuls of SketchUp source code. Horse and buggy not visible in this frame.

One last thing: I know that lots of you are concerned about how things are going to go now that we’re part of Trimble. The outpouring of “Don’t hurt my SketchUp!” sentiment after we made the announcement in April was completely understandable—and completely understood. You’ll have to take our word for it, but so far, things are looking good. If the way our team has been treated provides any clues (and I think it does), SketchUp’s future is very bright, indeed. The folks at Trimble “get it” in a way that’s hard to explain.

At the risk of sounding like a suck-up, the Trimblers I’ve met are kind, generous, smart and above all, genuinely well-meaning. A few of them have even joined us at the new office for the summer; that didn’t happen in 2006 when Google bought us. In the next month or so, I’ll use this blog to re-introduce some of the SketchUp team, as well as the other Trimble folk who are working closely with us.

Posted by Aidan Chopra, SketchUp Evangelist

Protect your images Blogger image hack

Monday, June 4, 2012

protect your images blogger trick
This is an awesome trick to protect your images.You can protect your images from copying with this Simple CSS Blogger Tricks.After applying this trick the person who save the image will get a transparent image instead of the original image.


Demo

Protect your image with CSS overlapping

  • Go to Blogger Account
  • Use the Following trick
<img src="Place image URL Here" />
<img border="0" src="http://2.bp.blogspot.com/-lQW7QlMoz10/T8yL_5IPF6I/AAAAAAAAAQU/5R8ngq17xzw/s1600/transparent.png" alt="NetOops protected image" style="left: 0px; opacity: 0; position: relative; top: -216px;" />
  • That's it.

Protect your image with SPAN background

  • Use the following code
<span style="background-image: url(Place image URL here)"><img src="http://2.bp.blogspot.com/-lQW7QlMoz10/T8yL_5IPF6I/AAAAAAAAAQU/5R8ngq17xzw/s1600/transparent.png" width="200" height="200" border="0" alt="NetOops protected Image."></span> 

  • You are done..
If you liked this article please share and like....

Awesome NetOopsblog Subscription Widget for blogger

Friday, June 1, 2012

NetOopsblog Subscription box Blogger
This post is about how to add a Subscription Box like our NetOops blog. Subscription box contains Facebook, Twitter, RSS Feed, e-mail subscription. This widget is based on a wooden theme. Facebook, Twitter, RSS Feed links are shown as Natural Wooden Sticky Boards. In this tutorial i am adding a new e-mail subscription box with wooden theme.


Subscription box with Fully Wooden Theme

  • Go to Blogger Dashboard
  • Go to Layout 
  • Select Add a Gadget
  • You can type title any
  • And Copy the following code in the content.
Demo of Fully Wooden Theme

 Important: If you don't want Mouse over effect of Images in the Subscription box, please delete the RED highlighted code,. If you want then leave it there.
    <style type="text/css">
     /* Delete form Here*/ 
    img.beintouch:hover {
        background: none repeat scroll 0 0 #D6D6D6;
        border-radius: 16px 16px 16px 16px;
        box-shadow: 0 0 10px #565656;
    }
    /* Delete to Here*/
    .emailtext {
        background: url("https://blogger.googleusercontent.com/img/b/R29vZ2xl/AVvXsEh0olVnG0rE_T_cclMKRSX6R6WLiMnoSciGo3a2cmFlXGtAXqLvEjVf601pMmDqJQgkTogQWU6rboR3oZ2efvFWn_rNx7AhjCUOgd0cGtnryNwcwfL7bwH1ik6iGyv6a_xRcOexT4JFEEc/s1600/mailbox.png") no-repeat scroll 4px center transparent;
        border: 1px solid #7E4E27;
        border-radius: 4px 4px 4px 4px;
        box-shadow: 1px 1px 4px #7E4E27 inset;
        color: #444444;
        font-weight: bold;
        margin-left: 2px;
        padding: 7px 15px 7px 35px;
        text-decoration: none;
        width: 176px;
    }
    .ebutton {
        background: -moz-linear-gradient(-45deg, #3C1F0E 0%, #D28A47 30%, #F9E183 30%, #D28A47 55%, #3C1F0E 100%) repeat scroll 0 0 transparent;
        border: 1px solid #D3D3D3;
        border-radius: 4px 4px 4px 4px;
        color: #FFFFFF;
        cursor: pointer;
        font-weight: bold;
        margin-left: -18px;
        margin-top: 5px;
        padding: 6px 15px;
        text-decoration: none;
        text-shadow: 1px 1px 0 #000000;
    }
    </style>
    <table align="center" width="317px" cellspacing="0px" cellpadding="1px"><tbody><tr><td><a target="_blank" rel="nofollow" href="http://www.facebook.com/pages/NetOops-Blog/159796530791611"><img src="https://blogger.googleusercontent.com/img/b/R29vZ2xl/AVvXsEg10fnBDkd-_hu2z0MFbAd9aE63e7xGTUtGl05pyEmaf4SucmYm392u5n1yNt4D_HtEpf7o8bkAfP1aQA9i154Fgcp0-DhJ8FxdCKjZsxPRA98EWS0_H2HFX88LJYHY2WXJSlOv272Epec/s1600/woden+board+facebook_netoops.png" class="beintouch" /></a></td><td><a target="_blank" href="http://twitter.com/netoopsblog/" rel="nofollow"><img src="https://blogger.googleusercontent.com/img/b/R29vZ2xl/AVvXsEgvRqQnni-pgKjPQi2a1QQbvPD8B2IYgY7Lwf3j4RDcEmuXdguw2j_jpgOrJIzKLLuc1Tr735C2CEzrwEGvgqeLWfZRuRUkrbUx1vE20L9TGJmdwtzC0uk-3pInWRDaKoGI8FWqk5bdXyk/s1600/woden+board+twitter_netoops.png" class="beintouch" /></a></td><td><a target="_blank" href="http://feeds.feedburner.com/NetOopsBloggerTricks" rel="nofollow"><img src="https://blogger.googleusercontent.com/img/b/R29vZ2xl/AVvXsEhDohUCHrMEFVOZYUGtMy2hWk3pqwjzVmBcUIs8MhAd7yRPJuO7p8ShJssf2Z-xjX3el1XDyq1hS53eYB0YinsflvMdoywQk-_jGwIHTR_2ZyI14Jym2ueHf4upR37Y5968T43Wr6GsPLU/s1600/woden+board+RSS1_netoops.png" class="beintouch" /></a><a href="http://netoopsblog.blogspot.com"></a></td></tr></tbody></table>
    <div>Get Latest Tips via e-mail</div>
    <form target="popupwindow" style="margin: 0pt;" onsubmit="window.open('http://feedburner.google.com/fb/a/mailverify?uri=netoopsbloggertricks', 'popupwindow', 'scrollbars=yes,width=550,height=520');return true" method="post" class="emailform" action="http://feedburner.google.com/fb/a/mailverify">
    <input type="hidden" value="NetOopsBloggerTricks" name="uri" />
    <input type="hidden" value="en_US" name="loc" />
    <input type="text" value="Enter your email..." onfocus="if (this.value == &quot;Enter your email...&quot;) {this.value = &quot;&quot;}" onblur="if (this.value == &quot;&quot;) {this.value = &quot;Enter your email...&quot;;}" name="email" class="emailtext" />
    <input type="submit" value="Subscribe" title="" class="ebutton" alt="" />
    </form>


    Change the BLUE highlighted code with FACEBOOK PAGE URL, TWTTER, FEED URL, FEED ID respectively.

    Subscription box with Default Basic Wooden theme

    • Go to Layout 
    • Select Add a Gadget
     Important: If you don't want Mouse over effect of Images in the Subscription box, please delete the RED highlighted code,. If you want then leave it there.
    <style type="text/css">
     /* Delete form Here*/ 
    img.beintouch:hover {
        background: none repeat scroll 0 0 #D6D6D6;
        border-radius: 16px 16px 16px 16px;
        box-shadow: 0 0 10px #565656;
    }
    /* Delete to Here*/
    </style>
    <table align="center" width="317px" cellspacing="0px" cellpadding="1px"><tbody><tr><td><a target="_blank" rel="nofollow" href="http://www.facebook.com/pages/NetOops-Blog/159796530791611"><img src="https://blogger.googleusercontent.com/img/b/R29vZ2xl/AVvXsEg10fnBDkd-_hu2z0MFbAd9aE63e7xGTUtGl05pyEmaf4SucmYm392u5n1yNt4D_HtEpf7o8bkAfP1aQA9i154Fgcp0-DhJ8FxdCKjZsxPRA98EWS0_H2HFX88LJYHY2WXJSlOv272Epec/s1600/woden+board+facebook_netoops.png" class="beintouch" /></a></td><td><a target="_blank" href="http://twitter.com/netoopsblog/" rel="nofollow"><img src="https://blogger.googleusercontent.com/img/b/R29vZ2xl/AVvXsEgvRqQnni-pgKjPQi2a1QQbvPD8B2IYgY7Lwf3j4RDcEmuXdguw2j_jpgOrJIzKLLuc1Tr735C2CEzrwEGvgqeLWfZRuRUkrbUx1vE20L9TGJmdwtzC0uk-3pInWRDaKoGI8FWqk5bdXyk/s1600/woden+board+twitter_netoops.png" class="beintouch" /></a></td><td><a target="_blank" href="http://feeds.feedburner.com/NetOopsBloggerTricks" rel="nofollow"><img src="https://blogger.googleusercontent.com/img/b/R29vZ2xl/AVvXsEhDohUCHrMEFVOZYUGtMy2hWk3pqwjzVmBcUIs8MhAd7yRPJuO7p8ShJssf2Z-xjX3el1XDyq1hS53eYB0YinsflvMdoywQk-_jGwIHTR_2ZyI14Jym2ueHf4upR37Y5968T43Wr6GsPLU/s1600/woden+board+RSS1_netoops.png" class="beintouch" /></a><a href="http://netoopsblog.blogspot.com"></a></td></tr></tbody></table>
    <div>Get Latest Tips via e-mail</div>
    <form target="popupwindow" style="margin: 0pt;" onsubmit="window.open('http://feedburner.google.com/fb/a/mailverify?uri=netoopsbloggertricks', 'popupwindow', 'scrollbars=yes,width=550,height=520');return true" method="post" class="emailform" action="http://feedburner.google.com/fb/a/mailverify">
    <input type="hidden" value="NetOopsBloggerTricks" name="uri" />
    <input type="hidden" value="en_US" name="loc" />
    <input type="text" value="Enter your email..." onfocus="if (this.value == &quot;Enter your email...&quot;) {this.value = &quot;&quot;}" onblur="if (this.value == &quot;&quot;) {this.value = &quot;Enter your email...&quot;;}" name="email" class="emailtext" />
    <input type="submit" value="Subscribe" title="" class="ebutton" alt="" />
    </form>


    Change the BLUE highlighted code with FACEBOOK PAGE URL, TWTTER, FEED URL, FEED ID respectively.

    I think this widget helps you, Please share and like...