This time, I'm going to focus on a faster (some might say smarter) technique for controlling the visibility of elements in your models: You can use Scenes to hide and unhide things without having to go anywhere near the Outliner or Layers dialog boxes.
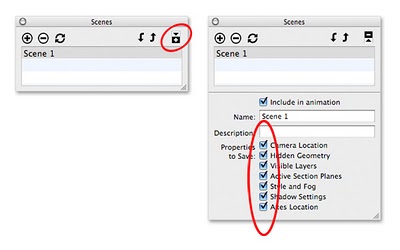
The key to using all of the deliciousness built into Scenes lies in expanding the Scenes Manager (Windows > Scenes) to reveal its extra functionality; the part we're interested in is the "Properties to Save" section at the bottom:
 Click the Expand toggle in the upper-right corner to see the rest of the Scenes manager. The "Properties to Save" section lets you determine which display settings each scene should remember.
You can customize a scene you've created by telling it which properties (display settings) it should save. Just select a scene in the list at the top the Scenes manager (single-click to select it), then choose which properties you want from the list. There's no "save" or "update" button to press; a setting is automatically saved as soon you select its checkbox.
Example
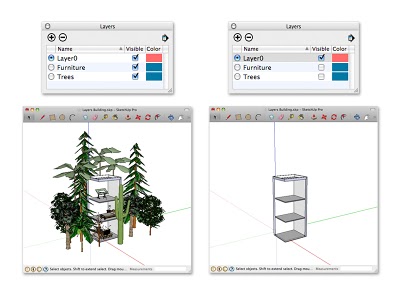
Consider the simple building I created for a previous post. In it, I created a layer specifically for all of the furniture in my model. For this example, I’ve added another layer to contain all of the elaborate trees I’ve added. Isolating the geometrically-complex parts of my model on separate, discrete layers makes them easier to hide when I want to boost my computer’s performance and get a better view of what I’m working with. See below for the updated, leafier model:
 Placing "heavy" stuff like furniture and trees on separate layers makes it easier to hide everything quickly.
I’d like to use Scenes to turn on and off my Furniture and Trees layers without having to access the Layers manager. To do so, I make two new scenes which will each have only one saved property: “Visible Layers”. Here’s how:
- Open the Scenes manager (Window > Scenes) and expand it by clicking the toggle in the upper-right corner.
- In the Layers manager (Window > Layers), turn off all the layers you want to control with a scene. (In this case, Furniture and Trees)
- Create a new scene by clicking the Add Scene (+) button.
- Name the new scene “Entourage OFF”.
- Make sure only “Visible Layers” is selected in the list of Properties to Save.
- Turn on the layers you turned off in Step 2.
- Repeat Steps 3 through 5, naming the newest scene “Entourage ON”.
Now all I have to do to hide my furniture and trees is click the “Entourage OFF” scene tab at the top of my modeling window. Since the only property saved by that scene relates to which layers were visible when it was created (or updated), no other display properties are affected by activating the scene. To turn everything back on, I click “Entourage ON”.
Feel free to download the model (SketchUp model) and try it yourself. Open the Layers and Scenes managers to see how everything’s rigged up.
Posted by Aidan Chopra, SketchUp Evangelist

0 comments:
Post a Comment
please put you comment to tips and tricks 2013